
Home
Getting started
Bring your software with Docker
Core concepts
How-to guides
Monitor and debugging
Developer tools
Glossary
Documentation HPC
A container registry is a storage and distribution system for container images, such as Docker images. It allows developers to store, manage, and share container images securely and efficiently. Container registries play a critical role in modern DevOps workflows by enabling the automation of application deployments and providing seamless integration with CI/CD pipelines.
In this article, we will guide you through the key features of Qarnot Container Registry. You'll learn how to:
By the end, you'll be fully equipped to integrate Qarnot Container Registry into your development workflows.
This page assume that you know how to build a container using docker. You will find some example in our documentation or on docker website.
Before you can start using Qarnot Container Registry, you need to activate it. This can be done in your account settings:
Once activated, you'll have the necessary permissions to push images to the registry.
To authenticate your local environment with Qarnot Container Registry, follow these steps:
Container Registry KeyIn your terminal, execute the following command, replacing [your username] with your actual username:
docker login --username [your username] https://containers.qarnot.com
Container Registry Key. This adds Qarnot Container Registry to your local Docker environment, allowing you to push and pull images seamlessly.If you fear your key might get compromised, you can manually renew your token using the Renew My Token button. You will then have to log again to the registry using the docker login command.
If you haven’t already created a Docker image, refer to our Docker Image Build Guide for a detailed walkthrough on how to create one. This guide will help you structure your containerized application before pushing it to Qarnot Container Registry.
Once your image is built, you can tag and push it to the Qarnot Container Registry. Use the following commands to achieve this:
Tag your image
docker tag SOURCE_IMAGE[:TAG] https://containers.qarnot.com/[qarnot_registry_id]/[CONTAINER][:TAG]
SOURCE_IMAGE[:TAG] with the image name and tag.[qarnot_registry_id] To find your specific registry ID, navigate to the Containers section, the empty screen displays the tag and push command and with your ID, you can find it afterward using the button.[CONTAINER][:TAG] should be replaced with the name and tag of the container you're pushing.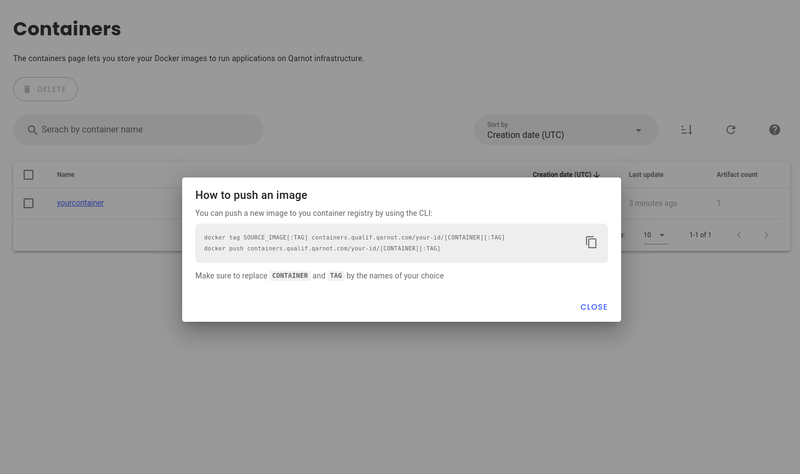
Push the image
docker push https://containers.qarnot.com/[qarnot_registry_id]/[CONTAINER][:TAG]
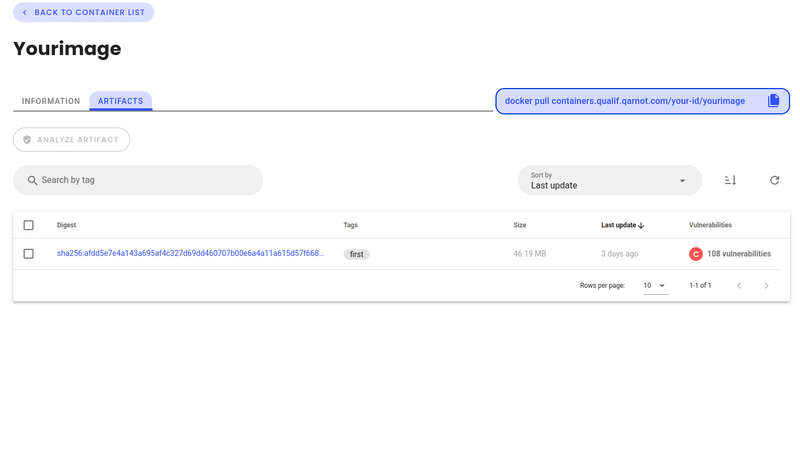
Once the transfer is completed you’ll be able to access your image in TasQ user interface.
After successfully pushing your image, you can easily visualize and manage it within Qarnot Container Registry:
This interface provides you with full visibility of the image and its associated metadata.
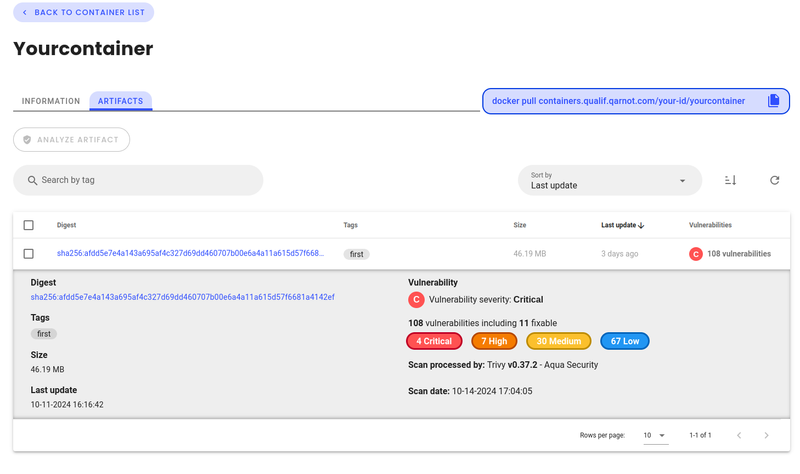
To ensure the security of your containerized applications, Qarnot Container Registry provides an integrated vulnerability scanning feature:
The analysis is conducted using Aqua Security Trivy, a powerful and industry-standard vulnerability scanner, hosted securely on our infrastructure. This helps you identify potential security risks before deploying your containers into production environments.
By following these steps, you'll be able to seamlessly push, manage, and secure your container images within Qarnot Container Registry. This functionality simplifies your DevOps processes, ensuring that your containerized applications are easy to deploy and maintain.
To start using docker images on Qarnot please read the following guides